

How to Setup Virtual Wifi in Windows 7 without Any Extra Software
Virtual WiFi, one of the features that Microsoft introduced in their new operating system Windows 7,
It means your PC many now be able to connect to two different Wi-Fi networks simultaneously without any additional hardware required.
You might be wondering why anyone would ever need multiple WLAN adapters on the same PC, well to be honest, you don’t need but its sometimes good to have. In any case where you’re connected to an existing wireless access point and want to connect to another network whether that be a separate access point or even set up an ad-hoc connection, Virtual WiFi will allow you to do just that. But perhaps the scenario that is more appealing is the idea of a mesh network. In a mesh network, every client becomes a repeater, growing the network organically as more clients connect. Virtual WiFi enables this, since every client can become an access point too.
Here is simple guide on how to create/setup Virtual Wifi on Windows 7.
1. Open a command-prompt with administrator privileges.
Click on Start menu, All Programs, Accessories, right-click on Command Prompt, select “Run as administrator”). Type in:
2. Configure the “hosted” interface:
netsh wlan set hostednetwork mode=allow ssid=Test key=password
This example creates an access-point with an SSID of “Test”,
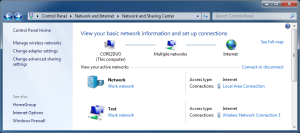
3. Configure Internet Connection Sharing (ICS)
Open up the networking control panel. Select the interface that currently has Internet connection (like your Ethernet or normal wifi), enable “Sharing”, and then select the special “hosted” interface.
4. Start it
netsh wlan start hostednetwork
It means your PC many now be able to connect to two different Wi-Fi networks simultaneously without any additional hardware required.
You might be wondering why anyone would ever need multiple WLAN adapters on the same PC, well to be honest, you don’t need but its sometimes good to have. In any case where you’re connected to an existing wireless access point and want to connect to another network whether that be a separate access point or even set up an ad-hoc connection, Virtual WiFi will allow you to do just that. But perhaps the scenario that is more appealing is the idea of a mesh network. In a mesh network, every client becomes a repeater, growing the network organically as more clients connect. Virtual WiFi enables this, since every client can become an access point too.
Here is simple guide on how to create/setup Virtual Wifi on Windows 7.
1. Open a command-prompt with administrator privileges.
Click on Start menu, All Programs, Accessories, right-click on Command Prompt, select “Run as administrator”). Type in:
2. Configure the “hosted” interface:
netsh wlan set hostednetwork mode=allow ssid=Test key=password
This example creates an access-point with an SSID of “Test”,
3. Configure Internet Connection Sharing (ICS)
Open up the networking control panel. Select the interface that currently has Internet connection (like your Ethernet or normal wifi), enable “Sharing”, and then select the special “hosted” interface.
4. Start it
netsh wlan start hostednetwork


It is pretty worth enough for me. In my opinion, if all website owners and bloggers will make good content as you did then internet will be a lot more useful than ever before.
ReplyDelete